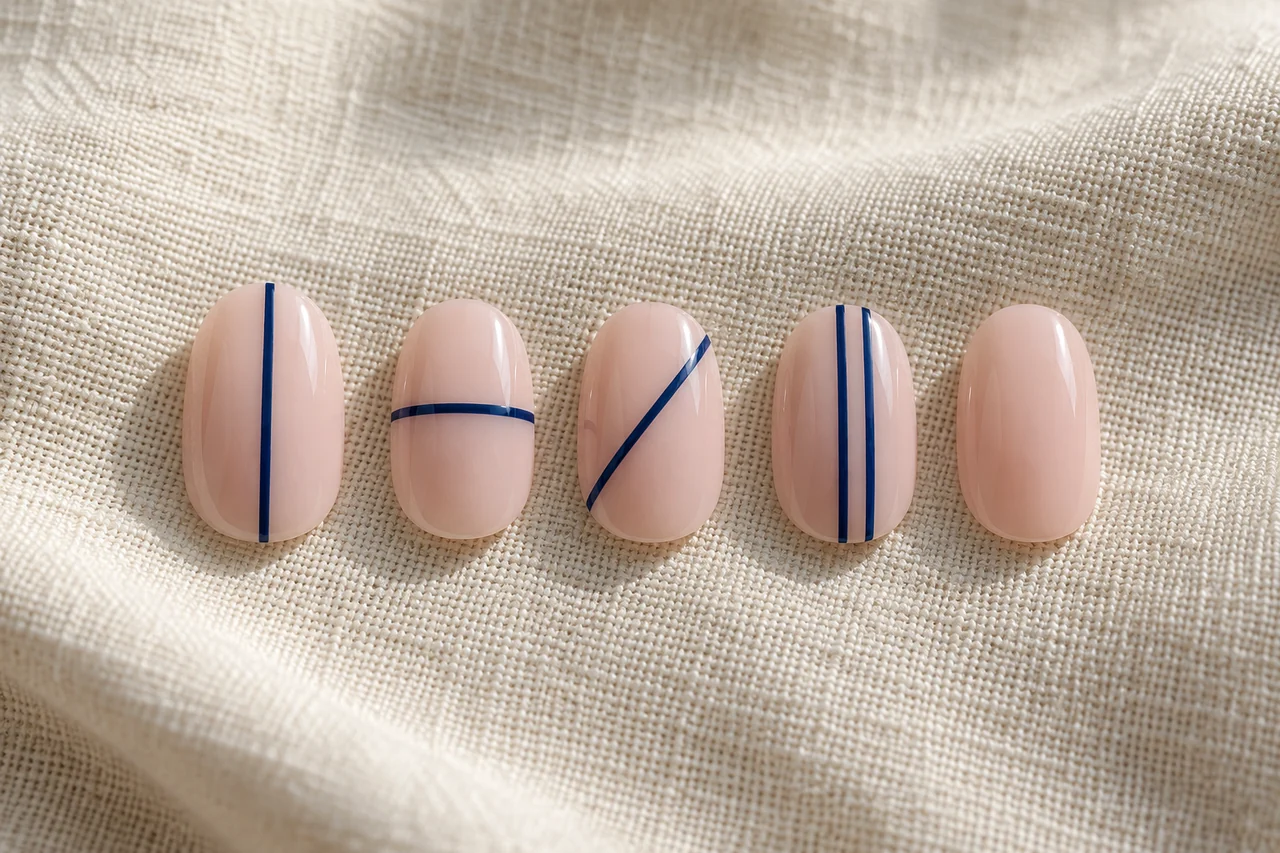
One stripe can define a whole nail design; several create a pattern whose gaps matter as much as the lines. Compare the ideas on paper without assuming a direction must change how your fingers look.
Compare three directions
Draw similar outlines with one lengthwise, crosswise and diagonal line of equal width and colour. View near and at normal reading distance. Notice direction and how it relates to a rounded or straighter outline. No finger category requires a particular option. If two appeal, save them separately before combining every direction on every nail.
Test width as its own choice
Copy the preferred direction with a fine line, narrow stripe and broad band. Moving from line to block changes the effect; a broad band may approach colour blocking. Fine detail is not automatically better or more sophisticated. It may be just visible enough or too faint in ordinary light. Your intended result matters more than difficulty.
Set gaps before adding lines
Begin with two stripes separated clearly, then consider a third. Does the base remain a connected background? Tiny gaps can disappear at distance, creating one darker area. That can be deliberate, but compare one and three lines on short nails before planning many repetitions. More elements do not necessarily add clarity.
Distribute the idea across the hand
Repeat one direction or reserve stripes for accents. If directions vary, shared colour and width can connect them. If colours vary, one direction can hold the pattern together. Compare one line for direction, two parallel stripes for visible spacing, and selected patterned nails framed by plain ones.
Choose an achievable application
For ordinary-polish practice, follow product directions and test a suitable tool on an intended sample. One slightly wider controlled line may work better than an extremely fine stroke requiring repeated repairs. Do not substitute household colours or adhesives. Intended cosmetic decorative strips have their own compatibility and application requirements; a painted line can express the same concept.
Compare with clothing and write the details
Look beside your rings, bracelets or striped sleeves. Lines need not all share a direction, but notice which element dominates. A narrow accent may complement a large geometric ring, while plain clothes may suit a stronger pattern.
Record base, colour, width, position and extent: “Sheer rosy base, one narrow navy vertical line slightly off-centre on two nails per hand, others plain.” State whether the line crosses the whole nail or only a short section. Afterwards change one feature, such as length, instead of restarting the complete pattern.
Frequently asked questions
Do vertical stripes automatically make fingers look longer?
A line can emphasise direction, but no reliable effect applies to every hand. Compare on your actual nail shape and decide by your own impression.
How many stripes fit a short nail?
Width, spacing and contrast determine that. Start with one or two lines in a roughly life-size sketch and add only while they remain readable.
Can stripes run differently on the two hands?
Yes. A shared colour or line width can connect the different directions as one deliberate design.
Questions and experiences
Share a question or a useful experience about this topic. Every contribution is checked before publication. Comments may be written in different languages.
Loading reader contributions…
Opening the form sets a necessary session cookie. No email address is required. Publication is subject to moderation and is not guaranteed. For deletion requests: Contact